")

Rexroth Pumps Pump Repair Manual,This manual covers most of the repairs to be done on Rexroth pumps. It will help you plan for a repair budget and helps in explaining more about all the steps involved to fix a pump.
Internal analysis picture of Rexroth hydraulic pump
Rexroth hydraulic pumps are high performance, compact and space-saving. They are suitable for use in mobile machines, industrial automation and machine tools as well as in stationary applications such as solar power plants or wind turbines.
The Rexroth hydraulic pump is suitable for a wide range of applications where a high pressure is required. It features an integrated oil level sensor that ensures safe operation without the need for an external sensor. The sensor also has an overpressure protection function.
The Rexroth low pressure axial piston pump is designed for reliable operation in harsh environments with high demands on reliability and durability. It has been designed for continuous running at pressures up to 150 bar (2 600 psi). The lubrication circuit consists of two independent circuits: the main one with a separate oil tank and a secondary one with an integrated oil level sensor. This allows the differential pressure between the two circuits to be set within a range from 0 to 15 bar (0 to 220 psi).
If you want to repair the Rexroth hydraulic pump, you must understand the internal structure. The following is the internal analysis picture of the Rexroth hydraulic pump:


Rexroth hydraulic pump main components
The Rexroth hydraulic pump is an integral component of the hydraulic system. It provides a source of pressure and flow to drive other components in the system. The pump consists of a rotating shaft, a piston, an internal gearbox and a housing. The rotating shaft is connected to the output shaft of the engine or electric motor. The rotating shaft transmits power from the engine to the piston which converts mechanical energy into hydraulic energy. The piston moves within two cylinders which are separated by a diaphragm that separates high pressure fluid from low pressure fluid. A set of gears within the housing of the pump changes this motion into rotational motion for use in hydraulic systems.
| Spindle skeleton oil seal |  |
| Various external oil seals |  |
| Rotary body assembly |  |
| Reversing piston |  |
| Oil distribution pan |  |
| Control unit HW/HD/EP |  |
| Charge pump |  |
| Control valve |  |
| High pressure valve |  |
| Low pressure valve |  |
| Pressure shut-off valve |  |
Remove the spindle seal

1.Use circlip pliers to remove the sealing circlip

2.Screw on the self-tapping screws and remove the skeleton seal

3.Install the skeleton seal

Remove the charge pump seal

1.With the chamfered side facing the end cap, when marked, remove the rear end cap
2.Pry open the rear cover
3.Check O-rings, grooves, sliding surfaces, coupling discs
Remove the seal of the servo cylinder

1.Make the mark and remove the side cover screws

2.Remove the fastening screws

3.Rotate the adjusting bolt and remove the side cover

4.Check pictures (1) (2) (3) for damage

Check the seal of the pressure valve

Remove the valve assembly, do not change the position of the adjusting bolt, check the setting after installation
Check Control Valve HD

1.Remove all valves,
2.Control O-ring, housing.
3.Replace jam nut, measure and record height (*). Check the valve pressure setting after installation.
Check all controls for seals

Check hydraulic neutral, O-rings, gaskets

If you can’t repair Rexroth Pumps, we provide you with the best value for money, click to view
Rexroth Pumps Repair Steps
Rexroth Pumps Disassembly and assembly Steps
step1

Remove the controls
step2

Remove charge pump and mark
step3-Remove the pump body

Mark the hexagon position 1, and rotate it to position 2, remove
step4

remove the rear end cap
step4

Remove the rear end cap and oil distribution pan
step5

Depress the cylinder body and remove the hexagon socket head cap screws 2
step6

Take out the rotor assembly
step7

There is a part of the seal ring that is not closed by metal, use a vise to pull out the seal
step8

Use a soft hammer to lightly knock the shaft out
step9

Remove the swashplate and bearings
step10

Take out the swash plate bearing locating pin
step11-Dismantling the control elements

1.Remove the side back cover

2.Take out the servo piston
3.Use circlip pliers to remove the circlip
step12-Disassemble the cylinder block assembly

1.Remove the center circlip
2.Remove spacers 1-2

step13-checked
Please see Table 2 below for details
step14-Assembling the Rexroth hydraulic pump
1.The oil distribution plate is rotated to the right, and the noise-reducing oil tank is processed in the direction of the oil guide.
2.The oil distribution plate rotates to the left, and the noise-reducing oil tank is processed in the direction of the oil guide.
3.Press the cylinder body to the bottom (see the direction of 1) and screw in the positioning bolts to open the positioning grooves.
4.Insert the oil distribution pan, the picture is right-handed
5.Insert the oil distribution pan, the picture is left-handed

Install the rear cover
Tighten the positioning nut to the specified size
Lock the back cover of the pump, and adjust the neutral position of the servo cylinder according to the specified size
Pay attention to the direction of rotation when installing the charge pump
Supply:
- You want to save money on repairs and maintenance of your machinery, but you don't know where to find the information you need. We'll show you two ways in which you can save money and time by using the tools available at Rexroth. This article is packed full of useful tips that will bring down your costs on repairs and maintenance.
| Check the inner and outer rings of the bearing. Whether the balls of the bearing have spots, corrosion, scars, whether there are spots, corrosion, scars on the inner side of the outer ring. |  |
| Check the support surface of the swashplate. Whether the support surface of the swash plate has Spots, corrosion, scratches, foreign objects, etc. |  |
| Check the sliding surface of the swashplate. Check the surface for severe ring scratches, abrasions and foreign objects. |  |
| Check return discs and ball joints. The wear depth of each hole of a return disc, the wear between the return disc and the ball joint. |  |
| Check the spline for damage and the wear of the mating surface, In particular, check for wear on the seals. There is no obvious impact wear on both sides of each key tooth of the spline, and the axial The smooth mating surface has no obvious groove wear marks, |  |
| Check the bottom surface of the shoe ( 1) for metal chips and cavitation. Whether the axial direction is stuck (2). Otherwise, it must be replaced with a new one. Measure the thickness of the slipper, |  |
| Check the mating surfaces 1 and 2 of the cylinder block and oil distribution plate No obvious annular slip marks, no more than 0.002mm deep. |  |
| Check piston rod. No visible signs of wear between the chute and the slider of a living room | 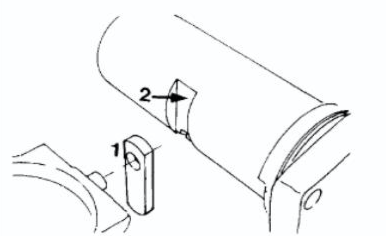 |
If you can’t repair Rexroth Pumps, we provide you with the best value for money, click to view
Looking for Rexroth Pumps Repair Manual? You will be glad to know that right now a Rexroth Pumps Repair Manual PDF is available on our online library. With our online resources, you can find Rexroth Pumps Repair Manual or just about any type of ebooks, for any type of product.
Related Reading


